By Nnanna Otuonye · Owner, SprayersAndParts.com · Authorized Graco Dealer · Houston, TX
Target Keywords: magnum x5 airless paint sprayer · graco magnum x5 setup · how to use graco x5 · graco magnum x5 first use · graco magnum x5 parts
The Graco Magnum X5 is one of the most capable airless sprayers a homeowner can buy at its price point. It’s also one of the most commonly misused — not because it’s complicated, but because the first-use experience catches people off guard. The machine works differently from anything you’ve used before. The pressure ranges feel unfamiliar. The priming process isn’t obvious. And several critical habits — like straining paint before loading and running Pump Armor before storage — are easy to skip on the first job, with consequences that show up on the second.
This guide gives you everything you need before you pick up the spray gun on job one: what’s in the box, what you need to buy before you start, how to assemble and prime the machine correctly, how to dial in your spray pattern, how to spray like you’ve done it before, and how to clean and store the machine so it’s ready for the next job. By the time you finish reading, the X5 will make sense as a system — not just a tool.
As an authorized Graco dealer, we supply OEM parts and replacement components for the complete Magnum X5 airless paint sprayer line. All parts referenced in this guide are available from our Houston facility with same-day shipping on qualifying orders.
What’s in the Box — And What’s Not
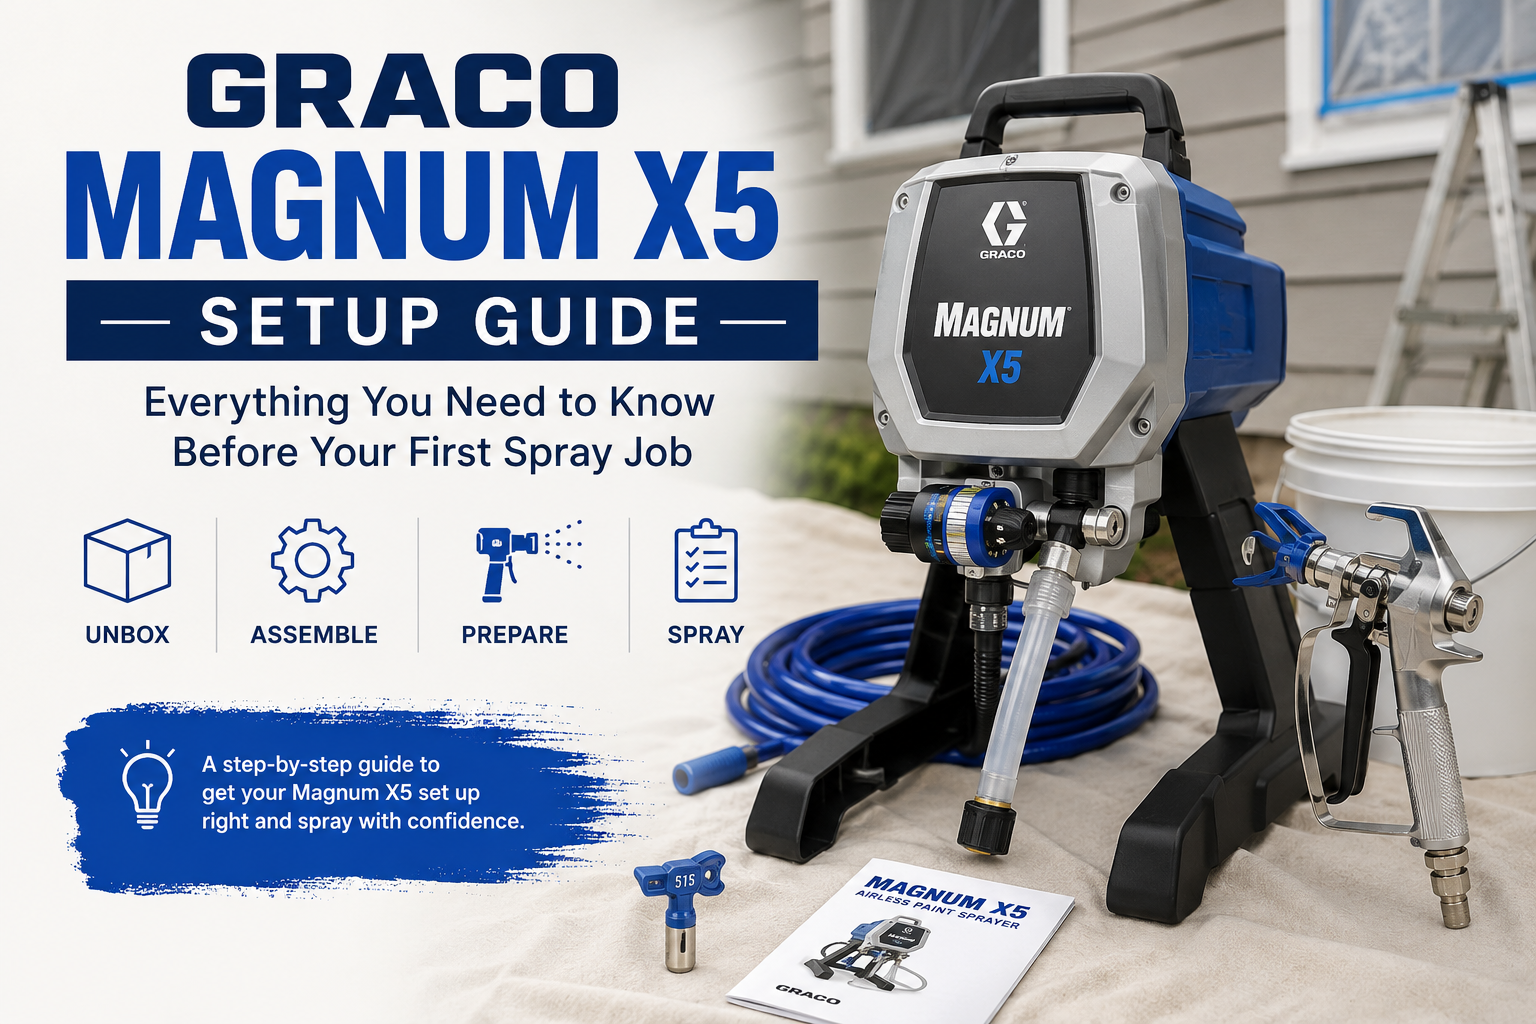
The Graco Magnum X5 (model 262800) ships with six components. Know what you have and what you’ll need to buy before you start.
Included in the Box
- SG2 Metal Spray Gun: The spray gun that connects to the hose. Has a gun handle filter inside, a trigger lock, and the tip connection at the front. The trigger lock is the safety — it physically blocks the trigger from being pulled. Always engage it when not actively spraying.
- RAC X 515 SwitchTip and Guard: The factory-included spray tip (10-inch fan, .015-inch orifice). The SwitchTip design lets you rotate it 180 degrees to unclog mid-job without removing it from the gun. The guard clips around the tip for safety and airless deflection.
- 25-foot DuraFlex Hose: The high-pressure braided hose that connects the machine to the gun. Both ends have standard threaded fittings. Tighten with a wrench at both connection points — hand-tight is not sufficient at 3,000 PSI.
- PowerFlush Garden Hose Adapter: Connects a standard garden hose to the suction tube inlet for fast cleanup. This turns a 15-minute bucket-flush cleanup into a 5-minute process. Keep it attached to the machine between jobs so you don’t lose it.
- Pump Armor (small bottle): The storage protection fluid. Run this through the machine after every job before storing. The included bottle covers 2–3 storage flushes. Buy a full 32-oz bottle (17S980) before your first job so you have enough.
- Quick-Start Card: A laminated card with the setup and cleanup procedure. Keep it. It’s more useful than the full manual for day-to-day reference.
What You Need to Buy Before You Start
- Pump Armor 32 oz (17S980) — ~$8: The included sample bottle is not enough for regular use. Buy a full bottle before your first job.
- Mesh bucket strainer — ~$3: Non-negotiable. Strain every bucket of paint before loading. Skipping this causes the tip and gun filter clogs that new X5 owners blame on the machine.
- Safety glasses and respirator: Airless sprayers atomize paint at 3,000 PSI into fine airborne particles. Eye protection and a respirator rated for paint fumes are required before you turn the machine on.
- Plastic sheeting and painter’s tape: Overspray from an airless sprayer travels significantly farther than brush or roller splatter. Mask everything you don’t want painted — including floors, windows, and adjacent walls — before loading paint.
- Cardboard for test spraying: You will need to practice and adjust pressure before touching your actual project. A piece of cardboard 2–3 feet wide is your tuning surface.
- Extra gun filters (5–10 pack) — ~$15: The gun handle filter catches debris before it reaches the tip. Replace at every new bucket of paint during production use. Keep a pack in your supply kit.
Quick Specs Reference — Know These Before You Start
| Specification | Value |
| Model Number | 262800 (Series A through E — check your serial tag) |
| Motor | ½ HP electric, 120V |
| Max Pressure | 3,000 PSI |
| Max Flow Rate | 0.27 GPM (gallons per minute) |
| Max Tip Size | .015″ orifice — do not exceed |
| Included Hose | 25 ft DuraFlex, ¼” diameter |
| Max Hose Length | 75 ft total |
| Annual Use Rating | 125 gallons/year |
| Weight | 13 lbs |
| Maintenance Fluid | Pump Armor (not TSL — this machine has no wet cup) |
| Included Tip | RAC X 515 — 10″ fan, .015″ orifice |
⚠️ The Spec That Will Save You the Most Trouble
Maximum tip size: .015″ orifice. The X5’s pump cannot sustain operation with a larger tip. If you buy a .017″ or .019″ tip and use it on this machine, the motor will run continuously without building adequate pressure, the pump will overheat, and you will accelerate seal wear. The .015″ limit is a hard engineering constraint, not a conservative suggestion. Check your tip number before installing it: the last two digits of any RAC X tip are the orifice size in thousandths. RAC X 515 = .015″ orifice. RAC X 517 = .017″ (X7 only). RAC X 413 = .013″ orifice (fine for the X5).
STEP 1 First-Time Setup — Assembling the Machine
The X5 ships unassembled. The setup takes about 6 minutes the first time and under 3 minutes once you’ve done it once. The key steps in order:
- Connect the hose to the machine outlet fitting. The outlet fitting is on the right side of the machine body — it’s a threaded port where the hose connects. Thread the hose fitting onto it clockwise by hand, then tighten with a wrench. Firm, not cranked — you’re tightening a fitting, not a bolt.
- Connect the other end of the hose to the spray gun. The gun inlet is at the rear of the gun handle. Same process: hand-tight first, then wrench-firm. Inspect both connections visually — the threads should be fully engaged with no gap.
- Install the tip guard on the gun. The guard clips onto the front of the gun around the tip connection point. It needs to be in place before you install the tip.
- Install the RAC X SwitchTip. The tip slides into the guard in the spray position — the arrow on the tip body points forward, toward the surface. Press firmly until it seats. Do not install the tip until the guard is on — the guard is a safety device, not decoration.
- Place the suction tube in your paint bucket. The suction tube is the larger braided tube that hangs from the bottom of the machine. Lower it fully into your paint bucket. The tube end should rest freely near the bottom — not touching the bottom or walls, which would block suction.
- Place the drain tube in a waste bucket. The drain tube is the smaller clear tube. During priming, paint flows backward through this tube into the waste bucket before pressure is built. Have a dedicated waste bucket ready before you start.
✅ Wrench Locations to Keep Handy
Keep a standard adjustable wrench near the machine during setup. You’ll use it to tighten the hose connections at both ends. Once tight, you should not need the wrench again until you disassemble for storage.
STEP 2 First-Time Prime — Flushing Storage Fluid and Loading Paint
Every X5 ships from the factory with Pump Armor storage fluid in the pump and hose. Before you load paint, you need to flush this fluid out completely. Skipping this step means spraying Pump Armor into your paint — which causes fisheye and adhesion problems on the finish coat.
Flushing Storage Fluid (First Use Only)
- Set the pressure dial to its lowest setting (fully counter-clockwise). Set the Prime/Spray valve to PRIME (pointing down).
- Place the suction tube in a bucket of clean water. Place the drain tube in a waste bucket.
- Turn the power switch ON. The motor will run in PRIME mode, drawing water up through the suction tube and out the drain tube.
- Run water through the machine until the fluid coming out the drain tube is completely clear and the Pump Armor smell is gone — approximately 30–60 seconds.
- Turn OFF. Remove suction tube from water. Ready to load paint.
Loading Paint and Priming
- Strain the paint first: Pour your paint through a mesh strainer into a clean bucket. This step is not optional. Unstrained paint contains debris that clogs the gun filter and tip orifice. Do this before every bucket, every job.
- Place the suction tube in the strained paint. Confirm the tube is fully submerged.
- Set the pressure dial to LOW (just above minimum). Set the Prime/Spray valve to PRIME.
- Press the PushPrime button: The orange PushPrime button on the machine body mechanically knocks the inlet ball off its seat to start paint flow. Press it once or twice to initiate priming. The machine should start drawing paint up through the suction tube within 15–30 seconds.
- Watch the drain tube. When paint — not storage fluid — begins flowing steadily through the drain tube, priming is complete.
- Turn OFF. Move drain tube to the paint bucket (so you don’t lose that paint). Turn ON. Switch the Prime/Spray valve to SPRAY position (pointing forward).
- Point the gun into the waste bucket (no tip installed yet). Unlock the trigger. Pull and hold the trigger. The pump will circulate paint through the hose. When paint flows steadily from the gun with no air bubbles, priming is complete. Release the trigger, engage the trigger lock.
- Install the spray tip. You’re ready to spray.
⚠️ PushPrime Won’t Start the Machine
PushPrime is not an on button — it’s a ball-release mechanism. The power switch must be ON and the machine must be running in PRIME mode for PushPrime to do anything. If the machine motor doesn’t start: check that the power dial is above minimum (not at zero), check that the outlet is live, and confirm the Prime/Spray valve is in PRIME position.
STEP 3 Setting the Right Pressure for Your Project
Pressure is the single setting that determines finish quality on the X5. Too low: the paint doesn’t atomize and the fan tails. Too high: excessive overspray and wasted material. The X5’s adjustable pressure knob covers the full range from near-zero to 3,000 PSI. The correct setting for your job is ‘the lowest pressure that produces a complete, even fan with no tailing at the tip edges.’ Find this setting on cardboard before you touch your actual surface.
The Cardboard Test — Do This Before Every Job
- Hold the gun 12 inches from a piece of cardboard. Gun should be perpendicular to the surface — not angled.
- Start with the pressure dial at approximately 1/4 of the range (low-medium).
- Pull the trigger and make a 12-inch horizontal pass, moving at a steady arm speed.
- Release the trigger. Step back and look at the fan pattern.
- Tails at the top and bottom of the fan: Pressure is too low. Increase one increment and test again.
- Complete, even rectangle with no heavy edges: This is your correct pressure. Note the dial position.
- Extremely fine mist and heavy overspray: Pressure is too high. Reduce one increment and test again.
- When the fan is correct on cardboard, you’re ready to spray your surface.
Recommended Pressure Ranges by Material
| Material | Start Here | Tip |
| Interior latex flat/eggshell | Low-medium | 515 — standard choice |
| Interior latex satin/semi-gloss | Medium | 515 or 513 |
| Exterior latex (standard) | Medium-high | 515 — machine limit |
| Deck or fence stain (thin) | Low | 413 for stain work |
| Primer (latex) | Medium-high | 515 — strain thoroughly |
STEP 4 Choosing the Right Tip for Your Surface
The spray tip is the component that determines fan width and material flow rate. The X5 ships with a 515 SwitchTip — the right tip for most interior latex work. But the 515 is not the correct tip for every project. Understanding the numbering system lets you choose correctly.
How to Read Graco Tip Numbers
Every RAC X SwitchTip has a three-digit number. The first digit, multiplied by two, gives you the fan width in inches. The last two digits give you the orifice size in thousandths of an inch.
- 515: First digit 5 × 2 = 10-inch fan. Last two digits = .015″ orifice. This is the factory-included tip. Correct for interior latex walls and ceilings.
- 413: First digit 4 × 2 = 8-inch fan. Last two digits = .013″ orifice. Correct for trim, doors, fences, and staining work where a narrower fan gives better control.
- 312: First digit 3 × 2 = 6-inch fan. Last two digits = .012″ orifice. Correct for spindles, narrow trim, and detail work where the 515 would over-apply.
- 517: 10-inch fan, .017″ orifice. Do NOT use on the X5. This exceeds the X5’s maximum tip size of .015″. It is designed for the Magnum X7.
Tip Selection by Project
| Tip | Fan Width | Best For |
| 515 | 10 inches | Interior walls, ceilings, standard latex — factory default |
| 513 | 10 inches | Interior walls with slightly thinner latex or semi-gloss |
| 413 | 8 inches | Fence stain, trim, doors, smaller exterior surfaces |
| 311 | 6 inches | Spindles, narrow trim, railings, furniture detail |
| 312 | 6 inches | Cabinet doors, detail work, fine-finish enamels |
✅ When to Replace Your Tip
Measure the fan width on cardboard at 12 inches from the surface. A 515 tip producing less than a 7.5-inch fan (25% collapse from rated 10 inches) needs replacing. Replace before it affects your finish quality — a worn tip makes the pump work harder and produces more overspray. Keep a spare 515 in your supply kit at all times.
STEP 5 Spray Technique — How to Move the Gun for a Professional Finish
The quality of the finish from an airless sprayer is 50% machine setup and 50% technique. The machine can be perfectly calibrated and still produce a terrible finish if the gun movement is wrong. These are the four technique fundamentals that determine the outcome.
Fundamental 1: Distance — 12 Inches from the Surface
Hold the gun 10–12 inches from the surface at all times. Closer than 10 inches and you’re putting down too much material per pass — runs and sags. Further than 14 inches and the paint has dried partially before it hits the surface — rough, gritty texture and wasted overspray. If you’re not sure if you’re at 12 inches, test: a standard ruler held from the tip to the surface. After a few sessions, you’ll feel the right distance without measuring.
Fundamental 2: Perpendicular — Gun Straight at the Surface, Always
The gun must be perpendicular to the surface at all times, not angled. Angling the gun at the start or end of a pass — wrist pivoting while the arm isn’t — creates a ‘bow-tie’ pattern where the edges of the fan are heavier than the center. Move from your shoulder, not your wrist. The gun angle relative to the surface should not change across a full pass.
Fundamental 3: Trigger Before Motion, Release After Motion
Pull the trigger just before your arm starts moving. Release it just after your arm stops at the end of the pass. Never start or stop arm movement with the trigger held open while the gun is stationary — this deposits a heavy stripe of paint at the start and end of every pass. The trigger sequence is: pull → move → stop → release. Not: move and pull simultaneously.
Fundamental 4: 50% Overlap on Every Pass
Each pass should overlap the previous pass by 50% of the fan width. On a 10-inch fan (515 tip), the next pass should start 5 inches into the previous pass. This produces even coverage without visible lap marks. New sprayer users almost always under-overlap and produce visible stripes that require an additional coat to cover. When in doubt, overlap more rather than less.
✅ The Practice Wall Rule
Before spraying your actual project, spend 5 minutes spraying your cardboard test piece using real motion — full arm passes at real speed. Adjust pressure until the fan is clean. Practice the trigger sequence. Look at the coverage pattern. Correct technique problems before you commit to the actual surface. A 5-minute cardboard session saves an hour of problem-solving mid-job.
STEP 6 Mid-Job: Handling Clogs, Bucket Changes, and Pressure Drops
Even with proper preparation, things happen mid-job. Here’s how to handle the most common mid-job situations without losing momentum.
Tip Clog — Fan Goes Streaky or Stops Completely
- Engage the trigger lock. Do NOT try to clear the tip with the trigger open.
- Rotate the SwitchTip 180 degrees to the unclog position (arrow points backward, toward you).
- Point the gun into the waste bucket. Disengage trigger lock. Pull the trigger for one full second — the reversed tip blasts the clog backward into the bucket.
- Rotate the tip back to spray position (arrow forward). Resume spraying.
- If the clog returns immediately: strain your paint into a fresh bucket before continuing. The paint has debris that will keep clogging. Also pull and inspect the gun handle filter.
Changing Paint Buckets
- When the paint level drops near the bottom of the bucket, do NOT wait for the machine to air-prime. Stop spraying when approximately 1 inch of paint remains.
- Switch to PRIME. Place the suction tube in the new (strained) bucket. Place drain tube in waste bucket. Turn ON in PRIME mode for 15–20 seconds until paint flows steadily through the drain tube.
- Switch drain tube back to paint bucket. Switch to SPRAY. Replace the gun filter with a fresh one. Resume spraying.
Motor Runs Constantly, Pressure Feels Weak
This is the sign of either a clogged gun filter (most common) or a pump issue beginning to develop (less common at this stage of ownership). The diagnosis order:
- Check and replace the gun filter first. Relieve pressure, unscrew the gun handle filter housing, swap to a fresh filter. If pressure restores — that was the cause.
- Check the spray tip. Swap to a fresh tip. If that helps — the old tip was worn.
- If both fail: run the 15-second motor cycling test (see maintenance section) to assess pump condition.
STEP 7 Cleanup — The Right Way, Every Time
Cleanup is where the X5’s reputation for being easy to own lives or dies. Done correctly — running the PowerFlush adapter and Pump Armor after every job — the machine primes reliably every time and lasts for years. Done incorrectly — stopping when the water runs ‘mostly clear’ and skipping Pump Armor — the machine fails on the next startup and you spend your next painting morning diagnosing a stuck inlet valve.
Latex Paint Cleanup — PowerFlush Method (Fastest)
- Relieve all pressure: trigger lock on, switch to PRIME, pull trigger into bucket until flow stops, turn OFF.
- Remove the spray tip from the gun. Pull and clean the gun handle filter.
- Attach the PowerFlush adapter to a garden hose. Connect the garden hose to the PowerFlush adapter at the suction tube port.
- Place the drain tube in a waste bucket. Turn the garden hose on fully.
- Turn the machine ON in PRIME mode. Water will flush through the pump, hose, and gun. Run until the water from the drain tube and gun runs completely clear — not mostly clear. Completely clear.
- Turn OFF. Disconnect PowerFlush adapter.
Running Pump Armor — Non-Negotiable Final Step
- Pour 6–8 oz of Pump Armor into a small cup. Place the suction tube in the Pump Armor.
- Turn ON in PRIME mode. Let the machine draw Pump Armor through the complete fluid path.
- After 20–30 seconds, point the gun into a waste bucket, switch to SPRAY, hold the trigger open until Pump Armor exits the gun tip.
- Turn OFF. Leave the machine in PRIME position with the drain tube in the Pump Armor cup. The machine is stored correctly.
❌ Never Stop at ‘Mostly Clean’
The residual latex that stays in the pump and hose when you stop flushing early dries on the inlet valve ball overnight. The next morning: machine won’t prime, motor runs fine, no paint comes up. This is the most common X5 service call — and 100% of cases trace back to incomplete flushing or skipped Pump Armor. Run the flush until the water is genuinely clear. Run Pump Armor every time without exception.
The 7 Mistakes Every First-Time X5 User Makes (And How to Avoid Them)
Mistake 1: Not Straining the Paint
Paint from any can or bucket contains debris — dried skin, particulates, and in older paint, chunks. The X5’s .015″ tip orifice is tiny. Unstrained paint produces constant tip clogs and gun filter blockages. Strain every bucket through a mesh strainer before loading. No exceptions.
Mistake 2: Setting Pressure Too High From the Start
New users often crank the pressure to maximum immediately, reasoning that more pressure means better coverage. The result is excessive overspray, wasted paint, and a rough textured finish rather than a smooth one. Start at low-medium. Test on cardboard. Increase incrementally until tailing stops. The correct pressure is always the lowest pressure that eliminates tailing.
Mistake 3: Holding the Gun Too Close or at an Angle
The most common cause of runs, sags, and uneven coverage. Gun must be 10–12 inches from the surface and perpendicular to it at all times. Practice the motion on cardboard until it feels natural before spraying the actual surface.
Mistake 4: Starting and Stopping Arm Motion With the Trigger Open
Holding the trigger open while your arm starts or stops moving deposits a heavy stripe of paint at the beginning and end of each pass. Pull the trigger just before moving, release it just after stopping. The paint flow should only be on while the gun is in motion.
Mistake 5: Using an Oversized Tip
Any tip larger than .015″ orifice exceeds the X5’s rated maximum. If you bought a .017″ tip (517) thinking it’s a small upgrade — it’s not compatible. Return it and use the included 515. The .017″ tip is designed for the Magnum X7.
Mistake 6: Stopping Flushing Before the Water Runs Clear
See the cleanup section. ‘Mostly clear’ is not ‘completely clear.’ The residual paint that stays in the fluid path dries overnight and causes the won’t-prime problem on the next startup. Run until completely clear.
Mistake 7: Skipping Pump Armor Before Storage
This is the single most consequential mistake a new X5 owner can make. Skipping Pump Armor even once can result in a stuck inlet ball the next morning. Run it every time — it takes 30 seconds and costs less than $2 per session.
Maintenance Quick Reference — What to Do and When
| Task | When | Why |
| Strain paint | Every bucket | Prevents all tip and filter clogs |
| Replace gun filter | Every new bucket | Prevents pressure drops, clogs |
| Flush completely (clear water) | After every job | Prevents dried paint in fluid path |
| Run Pump Armor | After every job before storage | Prevents inlet ball bonding |
| Test fan on cardboard | Start of every new material type | Confirms correct pressure setting |
| Inspect hose for damage | Before every exterior job | Safety — 3,000 PSI blowout risk |
| Run motor cycling test | Start of every job | Early warning for pump wear |
| Replace spray tip | When fan collapses 25%+ | Fan quality, pump longevity |
| Order 17V781 pump kit | When interval drops to 10–14 sec | Rebuild before mid-job failure |
The 5 Parts to Have on the Shelf Before Your First Job
All parts below are available as genuine OEM Graco components from our Magnum X5 airless paint sprayer parts page, with same-day shipping on qualifying orders before 1pm CST from Houston, TX.
- Pump Armor 17S980 (~$8) — 2 bottles: Run after every job. The most important consumable for X5 longevity. Buy two — one for regular use, one as backup.
- Gun filters (10-pack, ~$15): Replace every bucket during production painting. Essential consumable — stock generously and never ration them.
- RAC X 515 SwitchTip — spare (~$15): Keep one spare tip available. When the fan collapses on your current tip mid-job, a spare tip in the kit means you finish the job today instead of ordering one.
- 17J876 Inlet Housing Kit (~$22): Ball, spring, and seat. The part that fixes the most common X5 failure — won’t prime after storage. Have it on the shelf so it’s ready if you need it, not ordered after you need it.
- 17J880 Outlet Valve Kit (~$18): The second most common valve to need replacement. When the machine primes but won’t hold pressure at the gun, this is the fix. Keep one in stock before the first time you need it.
You’re Ready
The X5 is a capable machine that rewards the habits you build on day one. Strain the paint. Set pressure on cardboard before you touch the project. Move from your shoulder, perpendicular, 12 inches from the surface. Flush until the water is clear. Run Pump Armor every time you store it. Those five habits, applied consistently, are the difference between a sprayer that’s frustrating and one that’s your most useful tool.
First-time users who build these habits from job one almost never have significant problems with the X5 in normal homeowner use. Those who skip them — especially straining and Pump Armor — call us for parts within the first two jobs. Save yourself the trouble: do it right from the start. For any Graco Magnum X5 parts you need to stock or replace, our authorized dealer inventory ships same-day from Houston. Call us at 713-931-4102, Monday–Friday 8am–4pm CST, and we’ll confirm the right part for your machine’s series letter in under two minutes.
About the Author
Nnanna Otuonye is the owner of SprayersAndParts.com, an authorized Graco dealer based in Houston, TX. SprayersAndParts.com supplies genuine OEM Graco parts to homeowners and painting contractors across the United States, with same-day shipping on qualifying orders from the Houston facility. Call 713-931-4102, Monday–Friday 8am–4pm CST.